Thursday, 22 April 2010

Cin ya till what it iz yit?

I was particularly inspired by the use of everyday bits of hardware Helen had used on her wooden piece in Craft Stamper so before I had any ideas for a theme for my project I ventured into 'Aladdin's Cave' on Nottingham market. It's a wonderful place, piled high with fantastic bits of ironmongery, kit(s)chenware and truly priceless pieces of traditional hardware that, having survived the 70s, you thought you might never see again. I knew I'd find something to inspire me there and I did. This is it.


Don't ask me how I'm going to fix it on!

Monday, 19 April 2010

Ally Pally and this month's project

On 10th and 11th of this month, the four of us went to Alexandra Palace for the Big Stamp and Scrapbooking Show. We decided to make a weekend of it, and stayed overnight in a lovely B&B which Jo found for us. We hardly ever meet up, in fact, Elaine and Lesley had never met. We email each other so often though, that we feel like old friends when we do get together, as if we've known each other for ages.
We all made our way to AP from different parts of the country, and met up throughout the morning on Saturday, which was so exciting. We'd been waiting for such a long time to get together. It was lovely to wander around the demos together, and watch such talented crafters as Linda Brown and Linda Elbourne from LB Crafts, Jennie and Hels from The Artistic Stamper and Bev Rochester at the Hobby House stand. We were able to split up and do some serious shopping too!
We spent Saturday evening chatting and planning our mini Retreat in June, which will be the next time that we see each other. We then turned in ready for another day of soaking up the atmosphere at AP. Because we had chosen to spend two days at the show, Sunday was a good day to linger at the demos, to ask questions and pick up some top tips. The demonstrators are such lovely people, they are so down to earth, and really want you to know how to be able to do what they are doing. I spent ages with Hels Sheridan, and then Linda Elbourne, learning about various new products out there, which will definitely be appearing in my work in the future.
It was a very sad time when we came to say goodbye to each other, but we have our next venture to look forward to, our mini Retreat, and that will come around quickly enough I'm sure. I have already started a circle journal in preparation for the Retreat. You can see what I've done here We will each make a journal for ourselves, and everyone will complete a page in each journal at the Retreat. This will give us a lovely memento of our time there. I only need to produce a double page spread which will act as a kind of mood board, giving the other three girls an idea of what colours I like, my style, and any themes that I might like incorporated into the journal. Personally, I love what the other three do, and whatever they choose to produce for me would make me happy.
We've all been quite busy this month, and so our thoughts are now turning to our project. I know what I am making based on Helen Chilton's basic idea. I don't want to show you too much at this stage, sorry! However, I bought these gorgeous box feet by Tim Holtz at Ally Pally that I am going to use. I had seen them used on a book on someone's blog, and they are fabulous. I love Art Nouveau, and the little swirls on these feet really suggest that style to me. I think that I may be buying more of these! I plan to use lots of ink pads in varying colours, and lots of stamping this month. However, I am not going to show you my stamps, yet. Hopefully, we'll get some more sneaky peeks in soon, thanks for looking, Judith.

Sunday, 4 April 2010

What wood you like to make?

Well the time has come for me to announce the project that I have chosen for us to tackle for April. I have opted for Helen Chilton's 'Wood you believe it?' on pages 16-18 of April's Craft Stamper magazine.
I first encountered Helen through Graphicus and the galleries on the website there. Her vivid use of colour immediately caught my eye. I have always loved what she does, and I enjoyed her projects in Craft Stamper magazine, and then became a follower of her blog. Her project in April's Craft Stamper magazine is more muted in colour than some of her work, but I love the colours that she has chosen. The homespun nature of the stamps are particularly appealing to me, and I really like the vintage feel to the embellishments of the lace and buttons.
I feel that this project gives the four of us lots of scope for diversity based on the piece of wood that we choose. For example, a cube could become a photo holder, an ATC holder, or a jewellery holder, depending on the hardware at the top. A piece of floorboard could become a key rack or a mirror, a piece of skirting board could become some little houses like the ones on Helen's blog here I love the Delft style of these, the colour is just great, reminding me of trips to Belgium when I was younger. I would love to make a few of these for the kitchen.
So, a trip to the local ironmongers and the wood yard to scrounge some offcuts if you fancy making something with a wooden theme girls, you just need to get your thinking caps on now!

Thursday, 1 April 2010

The Lost Princess

This month’s project ended up being a real challenge. At the outset I just had too many ideas and it took far too long to rule any out. But here, at last, is my doll.


Lesley will be familiar with me saying ‘separated at birth’ because so many times we have had the same thought or wanted the same set of stamps. Where craft is concerned we seem to anticipate each other’s next thought. We are like crafty twins. This time it is our girls. Do you spot a resemblance? After seeing Lesley’s Peacock Princess I started to think of my doll as The Lost Princess. Maybe the two were indeed twins but separated at birth. The common factor here is a very talented lady who designs stamps for Elusive Images and has created both of the face stamps Lesley and I have used. Glenda says this lady lives a private life away from the non stop party world we internet crafters sometimes seem to inhabit. So I’m not even going to mention her name. But she has a fantastic eye for images that make great rubber stamps and maybe if anyone reading this knows her you can let her know how much her artistry is appreciated. One of the things I love about Elusive Images stamps is the recurring motifs. So I think the faces of these two princesses are quite alike.


I wanted a grungy style of doll with a spare kind of look to it. I also wanted to use some unusual materials. I’ve not quite achieved that. The doll’s body is made of paper strips just as Sue Roddis showed in the original Craft Stamper article. I’ve also used acrylic paints applied with a baby wipe as she did. At that stage the body reminded me of an African or South American native and at that point I introduced the neck decoration which is actually an acrylic ‘bead’ available here. I tried to find a script I could use to develop this theme but in the end resorted to printing the word ‘native’ in the ‘Symbol’ font on my computer. The main motif on the body is a Stewart Gill stencil, which has been inked through in black and the red crystals were from a supplier specialising in wedding crafts.

The face I’ve used is a Pierrot stamp from Elusive Images. I’ve backed it with both large and small versions of a sunflower type flower from the EI Big Flowers plate. The face has been overstamped with A Stamp In The Hand’s Field of Sky. I removed the ink from the eye area and gave her a clear Stardust eyeliner which I think just about shows in the close up pic.

The wings were originally chipboard shapes from The Artistic Stamper but I traced these onto glossy card when I decided to use a wax paper resist technique using the Divine Swirls Cuttlebug folder. I inked over the wax using DIs which complimented the paints I’d used on the body. They needed a little more visual weight before they looked right so I added threads and feathers as a nod to yet another kind of ‘native’.

The reel came with the wire on and I hoped to incorporate it into the doll design, although I had already combined both gold and silver finishes. I’d planned to use a coffee stirrer like Sue’s and had been collecting them for a couple of weeks so I had practice ones too. But as I was assembling the doll I had a kebab stick on my craft mat and decided to try that out.

It may be because it's Easter but I can't help feeling with the 'crown', the tears and the spread wings that this has a feel of the crucifixion about it too. Completely unintended but I can't shake the impression.


I still want to use my other ideas and intend to make lots more dolls. The early stages of this project were very exciting and I was pleased with the way things came together at the end. But the week in between where nothing looked right was quite painful.

Looking forward now to Judith’s choice for our next project.

Tuesday, 30 March 2010

Reveal Number Three: Journal Girl

Well, it's my turn to post my Art Doll based on Sue Roddis' project. Thank you Jo for seriously taking me out of my comfort zone, as I had never made an Art Doll before.
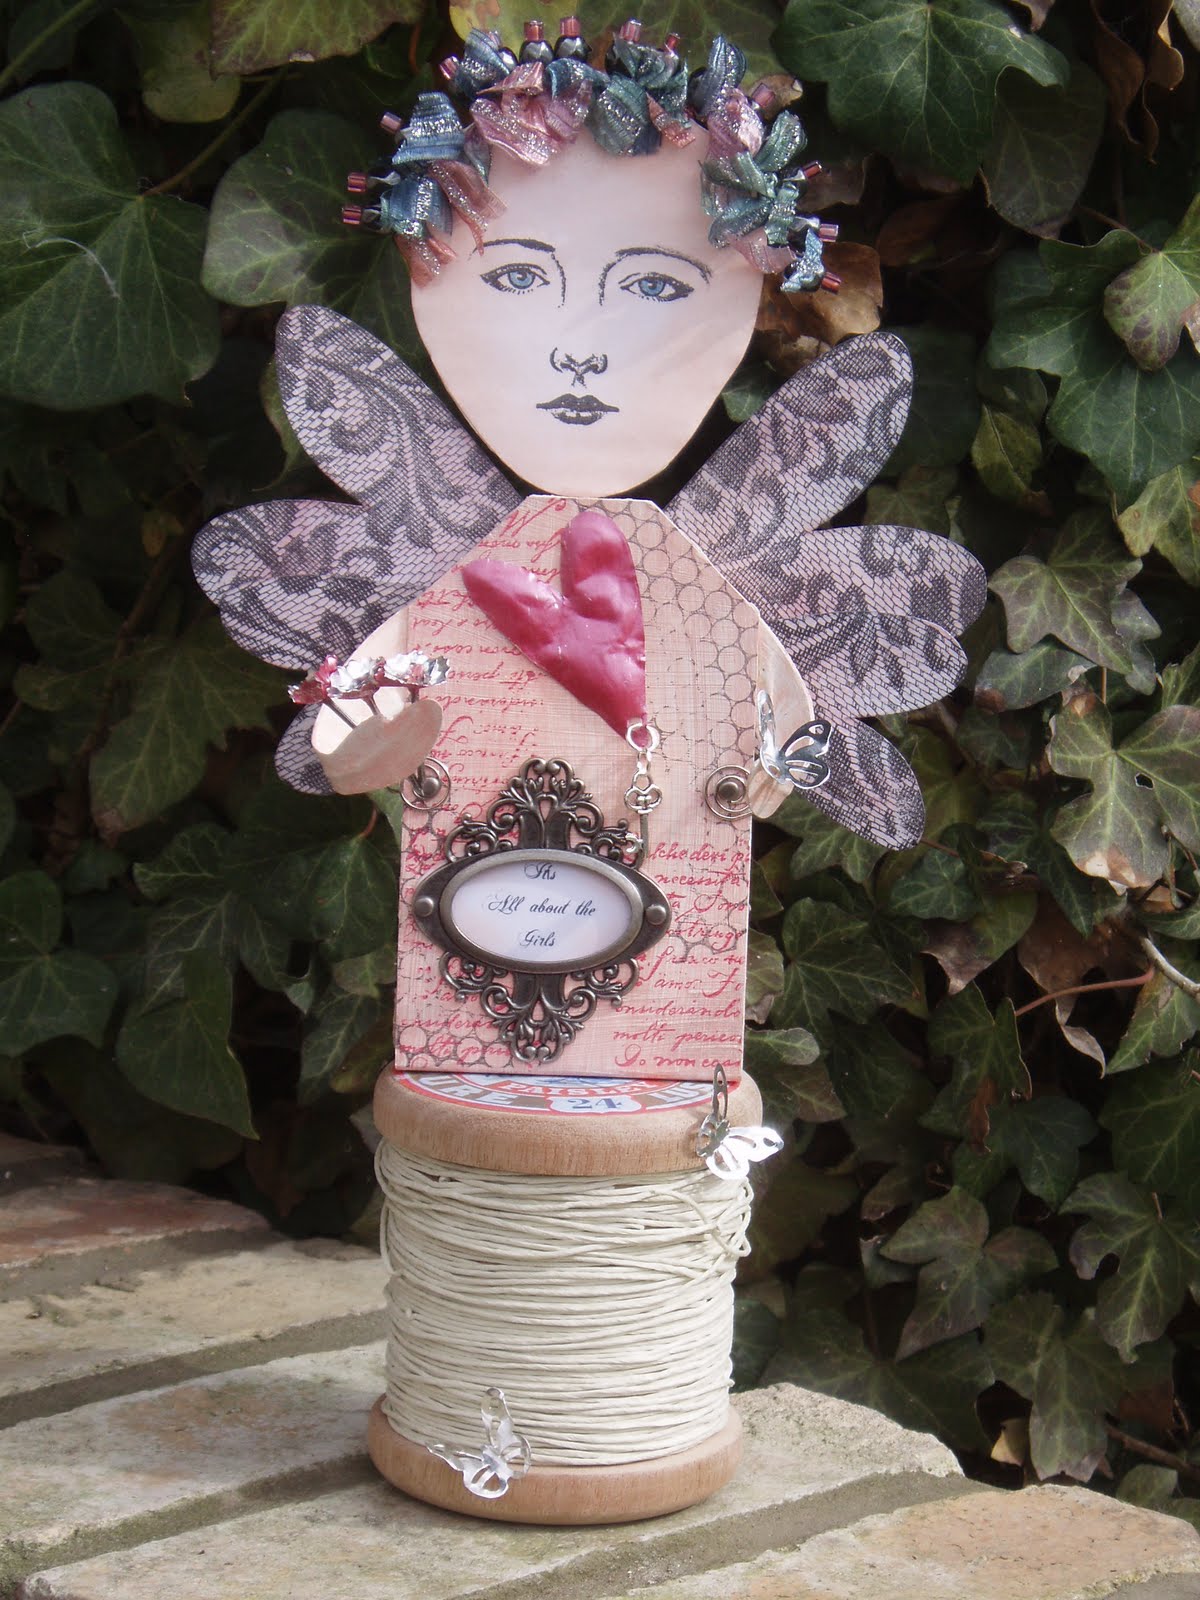
I kept thinking about what Sue had said that you could make one from whatever you wanted to, and decided to make one from a tag book.It was vaguely body shaped, so I was halfway there. I decided to turn the book into a journal about the 'girls' in my life, as Jo's title 'Here come the Girls' just stuck in my head. I've written about my Mum, who introduced me to crafting, Megan my lovely daughter, Jo, Elaine and Lesley, my three blog sisters, you all have pages about you. I have written about Glenda and Lynn from Graphicus, who gave me the stamps and confidence with colour and texture in the first place. I have written about Michelle, my youngest crafting buddy, about Kay and Amanda, who taught me to make jewellery, and then there is a page devoted to the many others; Kay Carley who taught me about Coloursoft pencils, Hels Sheridan, whose blog is inspirational, Sue Roddis, Helen Chilton, and many others who inspire me on a daily basis.


I gessoed the book and painted the pages with Salmon and Lake Mist Paint Dabbers. I edged the pages with Watermelon and Mountain Rose ink pads. I used a mixture of background stamps with Stone Gray and Cherry Pink Stazon to build up backgrounds. On the front of the book I made an insert for a Tim Holtz ideology plate which reads 'It's all about the Girls'. I have made a battered heart, to which I have added a little key and stuck this on. I have made the book close by bending two Woodware swirly clips and attaching two brads and hooking them on at the front only. They can then be unhooked as necessary.


I have made arms with two thicknesses of card and inserted wire before gesoing and painting with salmon paint dabber and a baby wipe. In one hand, Dot (Cotton), as my husband has nicknamed her, is holding three metal flowers, with nails for stalks. I had to put nails in there somewhere, to be true to Sue's project! On the other hand, is perched a metal butterfly.


I have used a B-Line stamp for the face, masking the hair and jawline, so that I only inked the eyes, nose and mouth. I used Tattered Rose DI to colour the face and Inktense pencils to colour the eyes. Her head decoration reminds me of curlers, hence the name Dot Cotton. I wanted to use nails, but they were too big for the beads, so I used head pins instead, tying a piece of ribbon at the base before pushing them into the cardboard. The wings are coloured with Tattered Rose, Victorian Velvet and Weathered Wood DIs, before stamping with a very old Aspects of Design lace stamp.
Elaine's husband very kindly sourced me a vintage cotton reel label, sized perfectly for my hand made wood turned cotton reel. I have used twisted paper string to represent the cotton, and attached two more metal butterflies.


My biggest challenge has been working out how to make my ideas work; I wanted her to hold the metal flowers, and to have a metal butterfly resting on her hand. My best friend has been UHU glue, it sticks everything! I'm sorry that this post has been so long, if you have stuck with me to the end, thank you. I hope you like my very tall offering, as I mentioned on my own blog, she is 32cms tall on her cotton reel. Thanks for looking, Judith x 

Sunday, 28 March 2010

And Next We Have the Peacock Princess!


Well I have to say Elaine started this month's end of month reveal with great style and imagination. Her art doll is absolutely gorgeous and I want to say a big thankyou to Jo for choosing Sue Roddis' Art Dolls project from last month's Craft Stamper magazine as our inspiration this time. I'm fairly sure I wouldn't have had a go at this if she hadn't and it was really good fun.


To a great extent I have gone quite out of my normal comfort zone not only in making the doll in the first place but in making her a bit fluffy and fussy. I've also used quite a bit more bling than I would normally although I suppose it's still quite restrained to some people, Lol! I used Sue's suggested method of making the body with strips of light card covered with a good coat of gesso and then blended Distress Inks to create the colours I wanted. I then lightly stamped a flourish in a golden colour, stamped off once onto scrap, in the background followed by the words You Inspire Me. I used stamps from the Elusive Images Peacock range to stamp the head with headdress onto card and coloured with Sakura Stardust pens. I let some ink from the pens flow out onto my craftmat and then picked it up with a water brush so that the colours were quite pale with a subtle shimmer. I stamped and coloured the same image again but masked out the face and then just coloured in hair for the back of the head. I then decorated the headdress with wire clips cut in half, fluffy white feathers and a bit of bling.


For the wings I used another of the Peacock stamps, this time onto acetate using Stazon and coloured the back of the image with Sakura Glaze Pens. I trimmed it down and into two to make the wings. I also used the fan spur (?) image from the same themeplates, stamped several times and coloured with H2Os, cut out and attached to the bottom of the body together with some more white feathers and bling and I think that's it. Oh yes, I used a well know coffee shop's wooden stirrer for the support at the back which is mostly hidden from view and in the absence of any lovely wooden bobbin, I used a glass taper candle holder which worked perfectly and, I think better fitted her attire than perhaps a bobbin would have done.


Well, I hope you like my offering for this month. I'm now waiting in anticipation to see which project Judith chooses for us to play with for the month of April. I'm also really looking forward to seeing Judith's art doll which will be the next one to be revealed in a couple of days followed shortly after by Jo's. Thankyou for visiting once again.

Hugs
Lesley Xx

Friday, 26 March 2010

Nature Girl

Well, here she is in all her glory – my very first art doll. Thanks to Jo for choosing this project and to Sue Roddis for the inspiration from her article in Craft Stamper. I do know my doll is rather girly, but I think I am happy with my efforts, although I have definitely got to the stage that I have looked at her too much!

I decided to take the main picture out in my garden because she looked like she belonged in the natural world. It was a bit breezy though and she kept slipping down, so she's turning up her toes a bit!! My starting point for the theme of my doll is the gorgeous and enormous Patchwork Butterfly stamp from Elusive Images. I stamped and embossed the wings onto black card and then painted the wings with H2O paints. The size of the wings then drove the size of the overall project.

I constructed the doll’s body, as Sue did in Craft Stamper out of strips, but I have ended up covering rather a lot of it up. It was a good robust construction though, as I managed to cut the arms out of the same panel too. I felt I needed a shapely doll and dress and used the free template that Jo had mentioned to me on the Enchanted Gallery website. Where would we be without these generous crafters that freely share their work? I used this template for the arms, legs and dress shape. The head uses one of my favourite little stamps called The Dreamer from Stamp Dreamer. I think this company has stopped trading now. This stamp is actually in a rectangular panel and at first I didn’t think I could use it. You can see the stamp in my earlier sneeky peek. Then I thought that the draping around her head looked a bit like her face was in a bud, so very apt for my natural theme.


I stamped the face onto brown card and coloured the image with Coloursoft pencils. I covered the frame with the flowers that make up her hair. These are the smaller flowers from the Martha Stewart hydrangea punch, each individually coloured with 4 or 5 different Distress Inks. I added a metal flower from a cheap necklace, I painted with Viva precious metal gold paint. I made a little necklace out of tiny flower shaped sequins that are nail gems from the Pound Shop!

The doll’s body was first coloured with gesso and then acrylic paint applied with a baby wipe. It was then overstamped with a lace tag stamp from WS Designs, in brown Versafine ink. The bodice is cut from Artylicious paper from my Graphicus Guild membership pack with little flower brads added. The hands were made from little Magenta maple leaf peel offs backed onto more paper. (Whoops - did I really say peel-offs?!)

The skirt is made from a number of layers of stamping. The first layer is made of Prima paper ivy leaves. Next is a layer made from a huge Beeswax stamp of beech leaves stamped onto orange mulberry paper and cut out. This is followed by an Impression Obsession Butterflies and Blossom petal set, stamped in black ink onto gold paper. Then another beech leaf layer stamped onto more Artylicious paper. The final couple of stamped layers are petals cut from a stamp from the Elusive Images Big Flowers set. These were stamped onto more Artylicious paper, individual petals cut out and then edged with Distress Ink.


I thought these layered up looked like scales on a pine cone, which again worked well for my Nature Girl theme. Finally I edged the dress with a strip of gold paper punched with the Martha Stewart Fall leaves edging punch, backed with a darker paper and cut to shape. I added a little twig with some lichen from my garden, a bee charm and the word Bee-lieve from another Beeswax stamp. The word Nature comes from a Paper Artsy stamp set that finding this link I see has artwork from the very talented isa Norris.

Last, but not least, I drew some stripey legs using a Copic fineliner and Inktense pencils (I never draw anything, I must have been feeling very brave) and added shoes made from more of the paper leaves with more leaf peel offs and little dragonfly brads I had painted gold. I mounted the whole thing using a coffee stirrer (which is probably not visible) on a piece of natural bark and with some pine cones from my garden.

Are you still awake after all that?! She was certainly fun to make and I can see the attraction of making art dolls now, so thanks to Jo and Sue for the choice and the inspiration.